Friday, February 25, 2011

Butter Almond Tea Cakes

 
 Most of the goodies that I bake are recipes I have been wanting to try that are in my ever growing list of recipes  and I mostly make them and share with my hubby's co-workers so I don't end up eating more than my share. Once in a while I take requests from friends.  A good friend of mine's husband was telling me about a local restaurant that had these AMAZING almond tea cakes at the brunch they went there for a while ago. And he wanted ME to make them for him. So I first called the restaurant thinking maybe, just maybe they would share the recipe or maybe give me a hint at what they are. I left a message and a manager was nice enough to call me back and tell me that the pastry chef would get back to me with the recipe. I can tell you I am glad I didn't  hold my breath. I had a feeling I wouldn't hear back. But it never hurts to try. 

So I was flipping through recipes in one of my cupcake books after looking online and not really seeing anything that he had described to me and I found the Butter Almond Tea Cake recipe in my book, Cupcakes! by Elinor Klivans. I am not sure if these were exactly what he was wanting but I thought they came out pretty dang good and all I can say is mini cupcakes are dangerous. You can eat them like popcorn. I mean shove them in by the handful. Well. Almost. Maybe in the privacy of your own home.


 First I toasted up some sliced almonds. I toasted a bunch since I sort of carelessly poured them into my pan and a bunch broke. They're very fragile.

 I really wanted to bump up the almondness ( yes that is a word. I say so) so I subbed a little of the all purpose flour with almond flour. All I had was almond meal so I put some in the trusty magic bullet blender and ground it up to a more flour like consistency. Don't grind too long or you end up with almond butter. Mmmm almond butter..


 Butter and almond paste mixing together. Almond paste comes in tubes or cans. Make sure you get almond paste NOT marzipan. Marzipan is much sweeter.


 There is just something pretty about cake batter plus t with the almond paste and extract made it smell so good.


 I have two mini muffin pan that bakes 24 cupcakes each so I was able to bake the entire batch at one time


 At first I was a little bummed they came out so flat but then realized that since they were getting just a swipe of glaze that flat would work better


 Wheeeeeee!!   I dumped them out because my oven mitt is a little thin in one area and it burnt my hand so I spazzed and almost dropped the muffin pan.


 I experimented a little with glazing some while hot and some while cool. I decided I liked the look of them glazed while cool a little better because the glaze sort of disappeared on the ones that were iced warm


 Aren't they cute?  They ended up being a very fragile cupcake, the crumb wasn't very dense, and they stuck to the wrappers. I think next time I will try a different recipe and look for a denser cake. Almost like a pound cake texture. These tasted great though and were liked by the friend that requested them


Butter Almond Tea Cakes

Adapted from cupcakes! By Elinor Klivans


Tea Cake Ingredients:

1 cup flour
¼ cup almond flour
1/2 teaspoon baking powder
1/2 teaspoon baking soda
1/4 teaspoon salt
1/2 cup unsalted butter, at room temperature
3/4 cup sugar, plus
1 tablespoon sugar
3 1/2 ounces almond paste, at room temperature
2 large eggs at room temp
1 tsp almond extract
1/2 cup buttermilk at room temp

Glaze

2 tablespoons unsalted butter, melted
1 1/2-2 1/2 tablespoons milk
1/4 teaspoon almond extract

Topping

Almond slices lightly toasted

Directions


  1.  Preheat oven to 325. Line 48 mini muffin cups with non-stick spray OR paper mini cupcake papers
  2.  Sift the flour, almond flour, baking powder, baking soda and salt into a medium bowl and set aside.
  3. In a large bowl, using an electric mixer on medium speed, beat the butter, sugar and almond paste until smoothly blended, about 1 minute.
  4.  Add the eggs one at a time, mixing until each is blended into the batter.
  5.  Add the almond extract and beat for 2 minutes or until the batter is smooth.
  6.  On low speed, add the flour in 3 additions and the buttermilk in 2 additions, beginning and ending with the flour and mixing just until the flour is incorporated and the batter looks smooth.
  7. Fill each cup with a slightly rounded tablespoon of batter. Bake just until the tops feel firm and a toothpick comes out clean, about 15 minutes. Cool in pans for 5 minutes.
  8. Remove from pans and cool on a wire rack.
  9. 9To make the glaze, in a small bowl, whisk the powdered sugar, melted butter, 1 1/2 tablespoons milk and almond extract until smooth. Add up to 1 tablespoon more milk if needed for the proper consistency.
  10.  If spread on warm cakes, the glaze will melt and become shiny. If spread on cooled cupcakes, the glaze will be white and opaque. The glaze will become firm as it sets.
  11. Top each mini cupcake with one or two of the toasted sliced almonds.

Sunday, February 13, 2011

Valentines Glitter Cupcakes


Ahh Valentines day. Some love it, some hate it, Hallmark makes tons of money off of it. I could take it or leave it but its always a good excuse to make cupcakes, especially ones with lots of glitter and sparkle. Since Valentines day is really more of a girly "holiday" than a manly one I decided to go over the top girly and make some fun, glittery, royal icing toppers.  I ADORE the blog, Sweetopia, and saw her LOVE cupcakes and wanted to try her technique, but not copy exactly. Marian is a genius when it comes to royal icing, her cookies are incredible, and she so generously posts tutorials and answers all of readers questions. I, on the other hand, am NOT so great with royal icing, but I am learning.


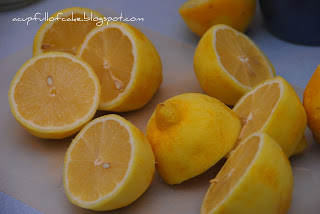
I had a pile of lemons that I couldn't remember exactly what I was originally going to do with them so I decided on some lemon cupcakes, but I have made lemon cupcakes before so I wanted to try a new recipe. We just recently signed up for a home dairy delivery from a local farm to get fresh, local, organic, lightly pasteurized only milk and stay away from the grocery store milk ( even the organic brands are homogenized and ultra pasteurized which kills all the GOOD stuff about milk) and the price is totally comparable. So yeah we have a MILKMAN now. So cool. I feel so retro, like a 1950's housewife. So I ordered a pint of real deal cultured buttermilk and made lemon buttermilk cupcakes. And to stick with the theme of Valentine's day and because I think they go so good together, I made Strawberry Swiss meringue buttercream.

I try to cook with and bake with as many organic ingredients that I can ( just plain better for you health wise - I try to keep my pesticide consumption to a minimum) and I am telling you all right now to try it at least once, if not maybe twice, to make frosting with organic sweet cream butter. OH MH GAWD is it insanely good. You can taste the rich cream that was used to make the butter. It has amazing flavor  - not bland at all. And with the strawberries added it tasted like strawberry ice cream. Honest it did. I know that some organic products can be more expensive but this is a splurge that is TOTALLY worth it.

I found these super cute Valentine's cupcake liners on sale at Michaels and I had to get them.
.
I was happy they showed up with the lighter cupcake batter. So many designs and prints on cupcake liners get washed out after baking. You can also see the flecks of lemon in the cupcakes from the lemon zest.  These smelled so good.


I used my Ateco #9 or as I call it my 1A on steroids piping tip to make huge swirls. I should have flattened the top down a little more than I did for placing my royal icing decors on.

Sweetopia has the tutorial on these and recipes for royal icing. I don't really know what I did wrong but mine were not dry in 24 hours and as I was trying to slide them off the acetate paper so many broke or bent from not being dry. And I know I used way too much Disco Dust. I have it all over my house still. Its basically floating in the air with all the rest of my house dust.


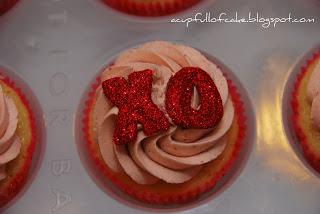
The red XO's look awesome in person. They just didn't photograph well. My camera was having a hard time focusing because they were so sparkly.


Oops. My husband said to use these because a broken heart can be a part of Valentine's day for some. Ouch!  I didn't use them. He was being silly. I hope! HA HA

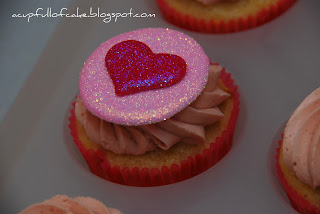
Pictures also don't do the lone heart justice either. I used osiana rose disco dust. I should have made the hearts a more peachy color than pink since the dust is peachy. Its so pretty. 


These are some of the few royal icing decors I manage to scrape off and not break.

This one was my favorite. Raspberry disco dust on the heart and the light pink on the circle. It showed up best in pics.

The hubby took these to work for Valentine's day. I always make his co-workers eat the cupcakes so I don't have to. But I did sample one and it was oh so worth every calorie. The lemon and strawberry combo is one of my faves for sure!

Of course I had extra frosting after I piped all the rest of the cupcakes so the hubby and I had these ones with sky high frosting. So GOOD!!!

Lemon Buttermilk Cupcakes
my recipe I adapted from several other recipes

For the cupcakes you will need:
  • 2 cup all-purpose flour
  • 1 tsp baking powder
  • 1/2 tsp baking soda
  • Pinch salt
  • 1 1/2 cup granulated sugar
  • 1/2 cup unsalted butter at room temp.
  • 4 egg whites - room temp
  • 2 tbsp grated lemon zest ( I use a lot but it makes them so good!)
  • 1 tsp lemon oil or extract
  • 1 cup buttermilk - room tem\p
  • 1/4 cup freshly squeezed lemon juice
Then you:
  1. Preheat your oven to 350 degrees and line two pans with cupcake liners.
  2. In a small bowl, mix together flour, baking powder, baking soda and salt.
  3. In a bowl, with an electric mixer, beat together sugar and butter until well combined. Add egg whites, one at a time, beating until well combined.  Add lemon zest and lemon oil, beating well. Alternately beat in flour mixture and buttermilk, beating until smooth. Add lemon Juice, beating until just smooth.
  4. Scoop batter into pan and bake 20-25 minutes or until tops spring back when lightly touched. Cool in pan on rack 10 minutes, then remove from pan and cool completely.


Strawberry Swiss Meringue Buttercream

Ingredients

Makes 5 cups
  • 4 large egg whites
  • 1 1/4 cups sugar
  • 1 1/2 cups (3 sticks) unsalted butter, room temperature, cut into tablespoons
  • 1 teaspoon pure vanilla extract
  • 1/4-1/2 cup strawberry puree ( puree either fresh or frozen and thawed strawberries in a blender)

Directions

  1. In the heatproof bowl of an electric mixer set over a saucepan of simmering water, combine egg whites and sugar. Cook, whisking constantly, until sugar has dissolved and mixture is warm to the touch (about 160 degrees). I use a candy thermometer and gauge it that way instead of sticking my finger into hot sugar egg whites. 
  2. Attach the bowl to the mixer fitted with the whisk attachment. Beat the egg-white mixture on high speed until it holds stiff (but not dry) peaks. Continue beating until the mixture is fluffy and cooled, about 6 minutes.
  3. Switch to the paddle attachment. With mixer on medium-low speed, add butter several tablespoons at a time, beating well after each addition. (If frosting appears to separate after all the butter has been added, beat on medium-high speed until smooth again, 3 to 5 minutes more.) Beat in vanilla. Beat on lowest speed to eliminate any air bubbles, about 2 minutes. Stir in strawberry puree with a rubber spatula until frosting is smooth.

Monday, February 7, 2011

No Bake Cookies

  
 No bake cookies. Seriously. If you are craving a cookie bad and A. lack the patience to wait for cookies to bake, B. have very little time but would rather have homemade rather than store bought or, C. Run out of important ingredients to actually make baked cookies like baking powder and baking soda ( like I did gasp!) then these are the type of cookie for you. Or cookies for you. Since they seem hard to stay out of. 


Wait. There's one more - D. If you're the type of person that would gladly sit down with the bowl of cookie dough and not even bother to bake it yet feel ever so slightly guilty about doing so then these are the cookies for you. Like slightly cooked cookie dough. mmmmm cooookkkiiieeee dough....


 I can't believe I haven't made these before. So easy. Like too easy. Like now that I know how to make them I can all the time since the ingredients are something I have on hand always. 


 I didn't take any step by step pics because my memory card for my camera was upstairs and they come together so quickly I didn't have time to go get it since I didn't realize it until I had the pan of ingredients already on the stove.


I think I might make my husband take the rest to work with him tomorrow so I don't eat the rest  today. In one sitting. Maybe two


There are a TON of different recipes online for No Bakes. Some with peanut butter ( which I am TOTALLY making next time) some without, most have rolled oats of some kind ( either regular or quick cooking) and some have cocoa some don't. I found so many different recipes my head was spinning ( almost) and I decided to kind of make up my own version. I had seen one that was oatmeal coconut cherry ( Um YUM) but no cocoa. I have some of my super yummy Valhrona dark cocoa powder left and I thought Chocolate coconut oatmeal cherry no bakes sounded to die for. And I am a bona fide coconut-aholic

So this is my recipe I came up with. Feel free to adapt into whatever cookie you fancy. Or eat these. They are so good. Too good.

Chocolate Coconut and Cherry No Bake cookies
my recipe

Ingredients:
1/2 c milk ( any fat content or even rice or almond milk. I used unsweetened almond)
1/2 c butter ( or coconut oil which is what I used)
1 c sugar ( I used organic evaporated cane juice. I think it has better flavor than white sugar)
2 tsp vanilla extract
5 tbsp cocoa powder
3 cups whole oats ( can use regular or quick cooking)
1 cup shredded coconut ( can use sweetened or unsweetened. I used UN since that's all I have)
3/4 c dried cherries

Directions
Prepare a cookie sheet with a piece of wax paper sprayed lightly with nonstick cooking spray. Or two cookie sheets depending on how many you make. I made about 30 cookies

In medium sized heavy saucepan, combine sugar, butter or oil, vanilla extract, milk and cocoa.  Over medium heat, while stirring often, bring mixture to a boil.  Boil for two minutes stirring occasionally.  When time is up, remove mixture from heat and stir in cherries, coconut, and oatmeal.

 Drop by heaping spoonfuls onto the prepared cookie sheets. You can mold them into rounder cookies if you want or leave more free form. Chill in fridge for an hour. Or 30 min in the freezer if you are impatient like me. Store in the fridge or freezer so they don't become a melty mess on your counter. That is if they even last long enough to get to that point.