Sunday, March 28, 2010

Chocolate Peanut Butter Hi-Hat Cupcakes

There is just really something fun with the Hi-Hat cupcake. The idea of a chocolate dipped cupcake with a mountain of frosting underneath sounds ridiculous and decadent at the same time. I have been wanting to make these for a while now. I can check this one off my list today. Since the majority of my cupcakes go with the hubby to work, his co-workers are starting to find which ones they like best ( I have yet to have anyone not like them, just some prefer certain ones over the others) and the chocolate cupcake with peanut butter frosting seems to be the standout. One of my husband's co-workers is pregnant and has requested me to make these. Myself being a pregnant gal as well right now just had to make these for her. Never deny a pregnant woman a craving!! They had all loved the Valentine's Hi-Hat cupcakes I made so why not change it up a bit with my chocolate peanut butter combo and make these Hi-Hats too? I used a different cupcake recipe, a chocolate sour cream cupcake recipe I got out of the Cupcakes! book by Elinor Klivans. She just so happens to have a traditional Hi-Hat recipe in this book and it is on my list to make as well. The typical frosting for a Hi-Hat is a marshmallow type frosting. I love marshmallow so I will have to make these. And probably soon!

Getting my ingredients ready, sugar and flour mixture. 

Eggs, sour cream and milk. The recipe calls for water and I think water does NOTHING for a recipe. Doesn't add anything flavor wise so I always sub with milk for a richer flavor.

This recipe calls for melted chocolate not dry cocoa powder which I think lends for a deeper chocolate flavor. Chopped up unsweetened chocolate.
Melted over a pan of simmering water til smooth and cooled until ready to go 

Butter and sugar creaming nicely

Adding in the melted and cooled chocolate to the butter sugar mixture
yummy
The recipe says it yields 18 cupcakes I think it would have easily made 22. The baked out over onto my pans, not puffing up. So I had to trim the edges off most of them to get the look I wanted. Plus it was fun to sample the trimmings!!

Getting ready to make the peanut butter frosting. Everything is better with butter!!

Butter and creamy peanut butter mixed together

it gets crumbly when the powdered sugar is added but then after the heavy cream is mixed in it is super smooth
 piped onto the cupcakes using a big plain round tip. The swirls don't HAVE to be perfect ( which is a good thing in my case) since they are going to be covered in chocolate. You can see where I trimmed off the edges of the cupcakes. Chill the cupcakes in the refrigerator until ready to dip.

Semi sweet chocolate melted and cooled with a touch of canola oil to keep in liquid enough long enough for dipping all the cupcakes

The look like those yummy dipped ice cream cones from Dairy Queen. When dipping, if all the edges don't get chocolate on them, lightly spoon more over, hold upside down a few seconds to let the excess drip off.

I decided to get all fancy and use some of my leftover peanut butter candy melts from some cake pops I made. Don't ask about the cake pops. Those were a disaster to make. I will leave those to Bakerella the cake pop goddess. Anyways. I melted these in a disposable pastry bag in my microwave on half powder, 30 seconds at a time until ready to use.

Fancy huh?


I like the way these came out. I didn't cut one in half though. Maybe my husband will have one tonight when he gets home from work and I will add in a picture of one cut in half before he devours!!

 Hubby wanted to try one so I made him cut it in half first for a pic!

He said it was really good!!


Chocolate Sour Cream Cupcakes recipe
(adapted from Cupcakes! by Elinor Klivans)
Ingredients
3 ounces unsweetened chocolate, chopped
1 c. unbleached all-purpose flour
1/2 tsp. baking powder
1/2 tsp. baking soda
1/4 tsp. salt
1/2 c. unsalted butter, at room temperature
1 1/4 c. sugar
2 large eggs
1 tsp. vanilla extract
1/2 c. sour cream
1/2 c. milk

Directions
Put chocolate in a heatproof bowl or the top of a double boiler placed over, but not touching, barely simmering water.  Stir until the chocolate is melted and smooth.  Remove from the water and set aside to cool slightly.
Sift the flour, baking powder, baking soda, and salt into a medium bowl and set aside.
In a large bowl, using an electric mixer on medium speed, beat the butter and sugar until smoothly blended and creamy, about 2 minutes.  Stop the mixer and scrape the sides of the bowl as needed during mixing.  On low speed, mix in the melted chocolate.  On medium speed, add the eggs one at a time, mixing until each is blended into the batter.  Add the vanilla and beat until the mixture looks creamy and the color has lightened slightly, about 1 minute.  Mix in the sour cream until no white streaks remain.  On low speed, add half of hte flour mixture, mixing just to incorporate it.  Mix in the water.  Mix in the remaining flour mixture until it is incorporated and the batter looks smooth.
Preheat oven to 350 degrees.  Fill muffin cups with cupcake liners with about 1/3 c. batter.  Bake about 15 minutes or until toothpick inserted in the center comes out clean.  Cool 10 minutes on wire rack and turn out to cool completely.  Yields 18 cupcakes.


Peanut Butter Frosting Recipe

Ingredients
½ cup softened unsalted butter
1 cup creamy peanut butter ( skippy etc not natural pb)
2 cups powdered sugar
¼ or so heavy cream

Directions
combine butter with peanut butter and cream add powdered sugar ( mixture will be stiff) then add the heavy cream a little at a time until you get the consistency you like for spreading or piping. Try not to eat it all before it makes it onto your cake or cupcakes. Its seriously good

you can also use crunchy peanut butter


Chocolate Coating Recipe

Ingredients
2 cups (12 ounces) semi sweet chocolate chips or baking bar chopped up
3-2 tsp canola oil

Directions
Melt chocolate in a double boiler or in a heat proof bowl set over a pan of simmering water ( but not touching) Stir frequently. Once the chocolate is smooth mix in the canola oil and transfer to a smaller, deeper bowl. One that will be better for dipping. Let cool for 10-15 min before dipping. Enjoy!!


Wednesday, March 24, 2010

Another Recipe Addition! Cosmopolitan Cupcake

I recently added the recipe to this yummy cupcake I made a while back. The Cosmopolitan Cupcake with Cosmopolitan buttercream. I added to my original post found HERE. Instead of re-blogging the entire post pics and all I just added the recipe to the original post. Enjoy!!

Tuesday, March 23, 2010

Mocha Cupcakes with Caramel Swiss Meringue Buttercream frosting

I have been going through some of my pictures on my file on my computer and have come across cupcakes that I have made a while ago and never blogged about! I don't have step by step pictures for most of these cupcakes like I do with my more recent ones but I do have the recipes! I had made caramel Swiss meringue buttercream for my Caramel Apple Cupcakes that I was originally not that thrilled with. I thought I cooked the caramel too long so it tasted like toffee, I thought it wouldn't come together like the attempts I had made with Swiss meringue buttercream in the past. I had saved the leftovers in the freezer to use at a later date. I thought a caramel mocha cupcake sounded good.

So I started with a mocha cupcake as a base. It is a good not overly rich cake but with a nice coffee flavor. I love anything coffee from cake to cupcakes to ice cream and well just plain ol coffee. So these definitely were an instant fave of mine. I thawed the buttercream and whipped back into shape ha ha. Frosted the cupcakes with a 1M swirl and sprinkled with some dark chocolate shavings. OH MY GOD. These were SO good. And I mean REALLY good. The combo is to die for. And looking at these and writing this up is making me want one but I don't have any. Guess they are going on my ever growing list of cupcakes to make. I have so many I want to try that are new recipes and so many I want to make again. So many cupcakes. Such little time. Sigh


Mocha Cupcake Recipe
(I have this recipe written down in my notebook of recipes so I don't remember where I got it from so I can't credit anyone for it. I know I found it online somewhere!!

Ingredients
1 1/3 cups all purpose flour
1/3 cup dark cocoa powder
1 tsp baking powder
1/2 tsp baking soda
1/4 tsp salt
1/2 cup whole milk
1/2 cup cooled strong coffee
1 tsp espresso powder
1/2 cup or 1 stick of butter at room temp
1/2 cup granulated sugar
1/2 cup light brown sugar packed
1 large egg room temp
1/2 tsp vanilla extract

Directions
preheat oven to 350 degrees and line a 12 cup muffin tin with cupcake papers
Sift together the dry ingredients in a medium bowl and set aside.
Stir the espresso powder into the coffee until dissolved, combine with milk and set aside
Cream butter and sugars together in an electric mixer until light and fluffy. Add the egg and mix until fully combined. Add the vanilla and mix again. Set the mixer speed to low and add the flour mixture and milk mixture alternating starting and ending with the flour mixture. Don't wait for each one to be fully incorporated before adding the next. Just add alternating until all is in. Should take about 60 seconds to do so. Mix on medium for about 20-30 seconds to get everything incorporated then stop. You don't want to over mix. Fill the cupcake tin about 2/3 - 3/4 of the way full in each cup. Bake for 15-20 min or until a toothpick stuck in the middle of one comes out clean or the top springs back lightly when touched. Just depends on your oven temp. Took 16 min in my oven. Cool in pan for 5 minutes then take out of pan and cool completely on wire rack before frosting. At least an hour.

Caramel Swiss Meringue Buttercream

Caramel Swiss Meringue Buttercream


Ingredients
Makes 5 cups
  • 1 1/4 cups sugar
  • 1/3 cup heavy cream
  • 6 large egg whites
  • Pinch of salt
  • 1 pound (4 sticks) unsalted butter, softened and cut into tablespoon-sized pieces
  • 1 teaspoon pure vanilla extract

Directions

  1. Make caramel: Pour 1/4 cup water into a medium heavy-bottom saucepan. Add 1/2 cup plus 2 tablespoons sugar. Cook over medium-high heat, stirring occasionally, until sugar is dissolved and syrup is clear. Continue to cook, without stirring, until syrup comes to a boil, washing down sides of pan with a wet pastry brush two or three times to prevent crystals from forming. Let syrup boil, gently swirling pan occasionally, until syrup is dark amber.
  2. Immediately remove from heat; carefully pour in cream (caramel will bubble vigorously). Stir caramel until smooth. Transfer to a bowl; let cool.
  3. Whisk together remaining 1/2 cup plus 2 tablespoons sugar, the egg whites, and salt in the heatproof bowl of a standing mixer. Set bowl over a pan of simmering water; whisk until sugar is dissolved and mixture registers 140 degrees on an instant-read thermometer.
  4. Return bowl to mixer; fit mixer with whisk attachment. Beat on medium-high speed until stiff. Reduce speed to medium low; add butter, a few tablespoons at a time. Continue whisking until smooth.
  5. Switch to paddle attachment. Add caramel and vanilla; beat on lowest speed until combined, 3 to 5 minutes. The buttercream can be made 2 days ahead and stored in the refrigerator. Before using, bring frosting to room temperature; return to mixer and beat with the paddle attachment until smooth.


Sunday, March 21, 2010

Recipe Updates

When I first started my blog I was just adding in pics and talking about the cupcake but not posting the recipes. I am adding in recipes when I find the time to do so. I recently updated my Margarita Cupcakes with the recipe, which were one of the first cupcakes I posted on my blog. I also keep finding photos of cupcakes in my photo file on my computer that I have yet to post. So I will also be adding them and their recipes as well. I don't have as many step by step photos to go with like I have been doing more of recently just the pictures of the finished product. I also have a GIANT list of cupcakes I want to make - new flavors and new decorating ideas so stay tuned for lots of goodies to come!!

My Margarita Cupcakes. Yum!

Friday, March 19, 2010

Hibiscus Cupcakes

I was surfing the net the other day for cake and cupcake ideas ( like I am always doing) and I always tend to look at tropical designed goodies. I LOVE Hawaii and anything to do with Hawaii so I am always looking for neat things to make that look, well, Hawaiian. I have been playing more with fondant lately and my plumerias I have been making are, well shall we say, need work? So I will continue to practice with those until I get good enough so they are cupcake topper worthy. I was looking at hibiscus cakes the other day and came across this gorgeous Hibiscus Cake on Flickr and fell in LOVE with it. The flat hibiscus fondant (or gum paste) decos are so cool and something I had never seen before. I saved it to my faves and started looking at more cakes similar. Another place that I found that makes cakes with the same design style ( and also where the cake on Flickr got their inspiration from is CakeLava. I am convinced they have THE BEST job on the planet. Making insanely amazing cakes in Hawaii. They have some cakes that I would love to have so I told my husband we need to get married a few more times in Hawaii just to have wedding cakes from them! I wanted to know HOW they made the flat designs. A friend of mine a few weeks back showed me this amazing machine called the Cricut that is used mostly in paper crafts like scrapbooking ( something I am not into) but they came out with a Cricut Cake machine. So totally cool. But I am not a professional baker, don't own a bakery or really have any reason to own the machine ( not to mention its not exactly cheap and the cartridges that hold all the images aren't cheap either) its still totally cool. So I decided to try it by hand and see how it would turn out.


 First off I had 3 leftover vanilla cupcakes from the St. Patrick's day cupcakes I had made. I saved 3 and didn't dye them because I WAS going to do a tutorial with filling and frosting ( which I will do at a later date) but after I saw the hibiscus cake on Flickr I wanted to attempt it with cupcakes.

First I frosted with leftover vanilla buttercream. I made two layers to make for a nice dome on top. I found a tutorial online over at one of my favorite blogs Cake Journal, that shows how to cover a cupcake in fondant.

They are shiny because I had just smoothed with a hot dry spatula as best as I could and then chilled in the fridge until I was ready to cover in fondant

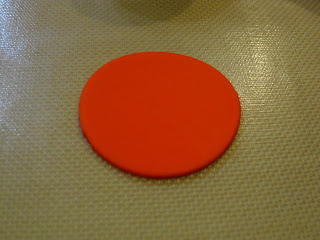
Here is my circle of fondant. My cutter wasn't the exact same size as the one stated in the tutorial. I had one that was too small, and one that was a little too big, I need one that is goldilock's style - juuussstt right. ha ha. I cut out the bigger one because I would rather trim off the extra than try to stretch and risk ripping the fondant. I wasn't totally sure if I had the correct thickness of fondant but I went with it.

 It didn't come out as SMOOTH as I would have hoped but better than I thought it would be. 

Here is my hibiscus stencil I made over my piece of rolled out white fondant. I use my silicone baking mat for rolling out fondant. I don't like using cornstarch or powdered sugar straight on my counter top. These mats work perfectly for smaller fondant or gum paste work. 

Also I was cutting the fondant out with my xacto knife since that seemed to give me the cleanest edges and I was trying to be super careful not to cut my mat.

All cut out. I did the stamen freehand because the stencil was too small.

Ready for the cupcake. I used vodka as my "glue" I like using it better than water because it dries a lot faster and doesn't leave any stickiness or residue.

It was super delicate so I had to move kinda slowly so it wouldn't tear.

You can see a little bit of a shiny spot on the red fondant from the vodka. I had places the two leaf section on and had to move it a little to make it where it was supposed to be

 Almost done!

Finished!

The red one I made

Orange

Yellow. I wanted them to be the colors of a Hawaiian sunset!

This is the fabric I used to copy one of the hibiscus flowers for my stencil. I have an apron I made myself out of this fabric. 


I think these would be perfect for a luau or any tropical themed party, even a Hawaiian themed wedding! Well maybe not as bright of colors for that! I also think the hand cutting method is a little time consuming. But I am pleased with how they came out. The Cricut machine would make things easier but like a friend of mine and I were talking about earlier anyone can use a machine, not many can make things by hand. She and I would both rather create by hand. Takes longer but makes me appreciate the fact that I can do this!

Tuesday, March 16, 2010

St Patrick's Day Cupcakes

I haven't played around with fondant in a while and I decided at very last minute to make some cupcakes for St. Patrick's day. I thought for some reason that my husband was working on Wed ( he normally has that day off) and or I thought today ( Tuesday the 16th) was actually the 17th of March. I am chalking it up to pregnancy brain. Ha ha. So I made a vanilla cupcake, separated the batter into 3 equal portions to color yellow and green ( I left one white) so it would be the same as the Irish flag and then frosted with a basic vanilla buttercream.  I had a BLAST making the fondant toppers. I found fabulous tutorials online at the blog, The Frosted Cake and Cookie for the Leprechaun hat and the shamrock, I googled images of fondant St Patty's day cupcakes, beer mugs, pots of gold. Not for the rainbow. I went to Kindergarten and so if I couldn't remember what a rainbow looks like I would be in big trouble. ha ha. 

I made the same recipe as I did in my Tagalong cupcakes for the cupcake batter but I used all egg whites and increased the milk a little. I will post the recipe for this and the buttercream at the end of this post. Like always! I used Wilton gel colors, leaf green and golden yellow.

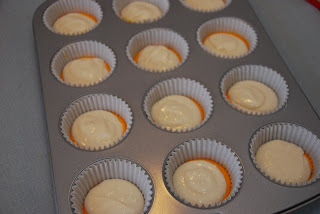
Yellow first. I used my small scoop or melon baller scoop so I made sure I had an even amount in each cup

Then the white. I used a toothpick to carefully spread the white over the yellow and made sure they didn't swirl

Then finally the green. Not sure why my pic is so bright. The batter really wasn't THIS neon!!

You can't really see the white as well as I would have hoped. I probably should have had the white layer be more batter than the other two. I had doubled my recipe but only made 18 cupcakes so they would puff up more. I made just 3 plain vanilla ones no coloring for a tutorial on filling and frosting cupcakes I am going to do soon.

Some of the batter on the bottom made its way to the top but then again that's what extra frosting is for. To cover up the blemishes and OOPS!

Fondant Shamrocks. I added pearl shimmer dust to make them sparkle a little. So hard to capture in the pictures. But they look great up close

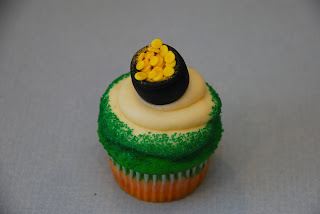
Fondant pot of gold. I recommend making things with black fondant LAST. You get black all over your fingers, tools, mats etc. I made "gold" coins out of yellow fondant by rolling small balls, flattening with my fondant smoother and then dusted with gold luster dust after I put them in the pot.

Fondant rainbow. Rolled out small balls of fondant into ropes, "glued" together with water and curved as I added each color.

Fondant green beer in mug with green beer foam pouring out. The foam is colored buttercream. I tried making the foam with fondant but I never got the look I wanted.

Fondant Leprechaun hats. Step by step tutorial for these is here

All my toppers ready to go

Swirled on vanilla buttercream with my Ateco 7T tip. Big plain round tip. I like the reflection of the cupcakes in my mixing bowl

I rolled the edges in green sugar. This was a MESS to do

I used my soy sauce dish from my sushi dish set for the dipping. Notice sprinkles all over my counter


Vanilla Cupcake recipe
from Cupcakes by Shelly Kaldunski

Makes 12 regular sized cupcakes
can easily be doubled as I did for these cupcakes
Ingredients:
1 1/4 cups all purpose flour
1 1/4 tsp baking powder
1/4 tsp salt
3/4 cup sugar
6 tbsp unsalted butter, at room temp
2 large egg whites, at room temp
1 tsp vanilla extract
1/2 cup whole milk

Directions:

Position rack in middle of oven, preheat oven to 350 degrees F. Line a standard 12 cup muffin pan with paper or foil liners

In a bowl whisk together flour, baking powder and salt, set aside.
In another bowl using an electric hand mixer or using a stand mixer, cream the butter and sugar on medium-high until light and fluffy, 2-3 minutes. Add the eggs one at a time, beating well after each addition and then add the vanilla and beat until just combined. Add the flour in three additions alternating with the milk. Don't wait for the flour mixture to be mixed in before adding the milk. You want the flour to be just barely combined. Scrape down the sides and then beat on medium -high speed just until no traces of flour remain about 30 seconds. Do not over beat.

Distribute evenly into the 12 cups, about 3/4 of the way full. Bake until lightly golden and a toothpick inserted into the center comes out clean or the top springs back when gently pressed. About 17-20 min. Let the cupcakes cool in pan for 5 minutes then take out of pan and transfer to wire rack to cool completely before filling and frosting, About an hour.
Basic Vanilla Buttercream recipe
Ingredients:
3 sticks unsalted butter room temp
4 cups sifted powdered sugar
1 tsp vanilla extract
1 tbsp meringue powder
dash salt
1-3 tbsp heavy cream ( just add until you reach desired consistency
Directions:
Cream the butter in electric mixer with whisk attachment until light and fluffy.Add the meringe powder to the powdered sugar and slowly whisk together. Add the powdered sugar mixture one cup at a time mixing slowly at first so you don't cover your counter, kitchen, self, significant other, cats or dogs in powdered sugar. Once all the sugar is incorporated mix on high to aerate and make fluffy. Add the vanilla and salt and mix again well. Slowly add the cream one tbsp at a time until reach desired consistency. This is a stiff icing and holds shape well when frosted. makes enough to pipe 24 cupcakes or 18 with GIANT swirls.